Part 2: Azure Functions – Creating our first Function
In the first article of this series, we had a quick overview of concepts for Azure Functions. In this article we will create a simple function and run it locally.
Prerequisites
Before we can create our first Azure Function, we need to set up the development environment. We will be using the increasingly popular Visual Studio Code as our IDE. Checkout the steps to download and install Visual Studio Code here.
Next, we will install Azure Functions extension for VS Code. Click the Extensions icon on the vertical left menu. Type Azure Functions in the search field, click on Azure Functions from the search results. A new tab will open to the right. Click on Install button to install this extension.
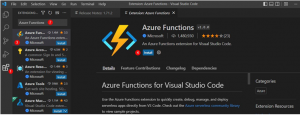
Note that two other extensions – Azure Account and Azure Resources – will also be installed as they are dependencies for Azure Functions.

To run and test our functions locally, we need to install Azure Core Functions Tool. See this to download and install this tool.
Our first Azure Function
Next, go to VS Code and open the Command Palette. Use keyboard shortcut Ctrl + Shift + P (use Cmd + Shift + P on Mac) or View > Command Palette… menu option.

After the Command Palette opens, type Azure Functions into text box and select Azure Functions: Create New Project… option.

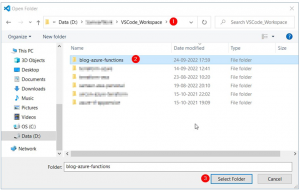
Create a new folder called blog-azure-functions. We will use this new folder as our project folder.
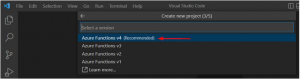
Now we will go through a wizard to create the function. The first step is to choose the language for the Azure Function. For this article, we will go with C#.

The next step will be to select the version of Azure Functions. We will go with version 4 as that is recommended and also happens to be the latest version.
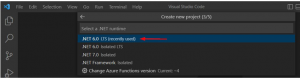
Next, we’ll choose .NET 6.0 LTS as the framework.
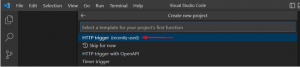
We want this function to be invoked by making an HTTP request. Hence, we will choose HTTP as the function trigger.
Next, we have to provide a name for our function. We will name it SimpleHttpFunction.

We will use CloudBuff.Function as the namespace.

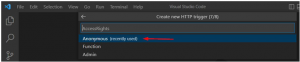
The last step is to decide the access rights for the function, i.e., specify the type of authentication required to successfully invoke the function. Since we want this function to be accessible without any type of authentication, we will choose Anonymous.
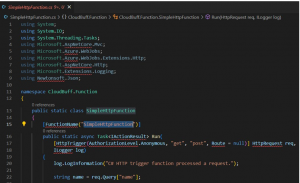
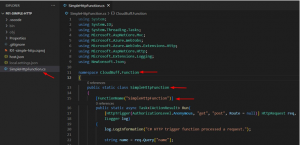
VS Code will generate sample code for this function – similar to the screenshot below. Some keywords may be underlined with red, squiggly lines. This indicates that there are some unresolved dependencies or references.
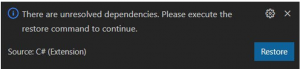
There will be a small pop-up on the bottom right asking to execute the restore command. Click Restore and that should resolve all references, making the red squiggly lines disappear.
Note that the code is created in file SimpleHttpFunction.cs – using the function name that was provided.
Test the function
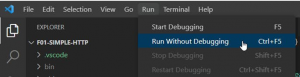
Now, it is time to test the function. To run the function, click the option Run Without Debugging under the Run menu.
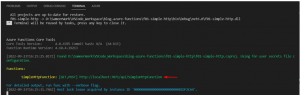
A new Terminal view will be opened and once the function starts, it will show the URL for the function: localhost:7071/api/SimpleHttpFunction.
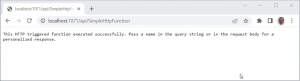
Copy the function URL and paste it in a browser. If a message like the one below is displayed, it means our function was executed successfully.
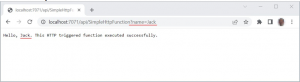
Now let’s modify the URL. Add a name query parameter with Jack as the value. We will get a different response now.
And that’s it!! We were able to successfully create a function and test it locally.
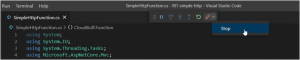
To terminate the function, select the stop option from the run/debug bar.
Conclusion
In this article, we created a simple function with HTTP trigger and tested it locally. In the next article, we will deploy this function to Azure cloud.